We did a lot to make it fast and comfortable for users to work with data: our product now uses MS SQL Server database, client and server were optimized so that Business2Go is much faster with large data volume (tens of thousands of records). But what if there are more records in a list, let’s say hundreds of thousands or even millions? And what if the data is accessed via internet? Sadly, the user is going to have a hard time waiting for program response, sometimes a really long time. For example, showing the whole list of cities (specially prepared test data list with roughly 175,000 records) will take 20 seconds. You can extrapolate this on millions of records and imagine the minutes that you are going to spend waiting to see them. And this is, of course, totally unacceptable.
Different systems have different solutions for the big data problem, although often the problem is completely ignored by products for small and medium sized businesses. Enterprise-level products mainly use pagination, load more on scroll or sometimes asynchronous loading. We chose to stick with pagination which is a traditional solution for lists with significant data volume. But in different lists you can choose the mode yourself, whether you need to use pagination to load the data faster or see all your data at once. You might need to avoid such disadvantages of pagination:
If a list counts totals by columns, the only available data for count will be that of current page;
You can export the data only from current page;
Same problem with printing the list.
However, in general pagination provides many advantages one of which is that you avoid lags when you work with huge data lists. Here is what we learned from our test:
Showing all 175,000 records in the list takes around 3 minutes;
With pagination mode on (with a portion of 1,000 records) showing the list takes less than a second.
Let’s take a look at how you use pagination in Business2Go. To turn it on in a list go to the list menu and select Pagination (alternatively, you can select the same command in form menu). This command usually can be found in View ribbon menu as you can see in the picture.
After you turn on pagination mode, you can manage it from the panel below.
From this panel you can navigate the pages using the navigation buttons or enter the page number directly in the field (also you can select one from the dropdown). You can change the number of records per page in Page Size field.
As you see, this is pretty simple. It is also really fast. What’s more important, you can use it only when you need it.
Even before the new version is released we get a lot of opinions on improving Business2Go. One of those that we have already put into practice concerns data filters. In the article we wrote about new features we were going to introduce in filters, such as an option to create complex filtering expressions and save them in data storage. Since in many cases complex expressions in data filtering and information search are reasonable alternative to reporting system, it was met by our users with high appraisal, and so was a useful option of storing these expressions for further use.
There can be dozens of stored expressions like these and even hundreds if you’ve been using the product for a while. So at times, it can be a bit challenging to find a particular filter. However, even with a large amount of stored expressions there will only be a few that you use the most and would want to access as quick as possible. And this is where our new Favorites feature will be extremely helpful. It’s pretty similar to that of web browsers. Let’s have a close look at it.
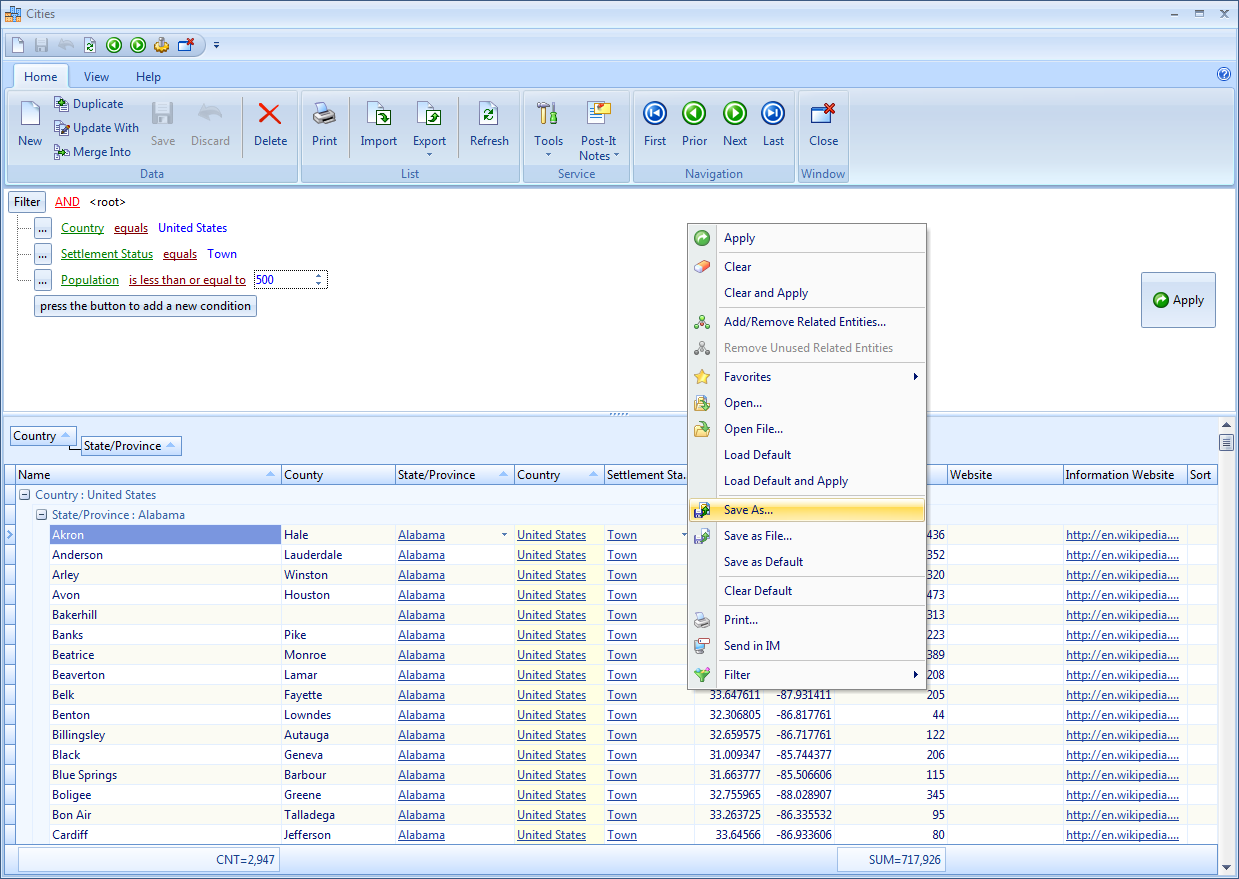
Generally, Favorites is based on an internal mechanism of filtering expression save and load with just a little enhancement. Let’s create a filter in the Cities module and save it.
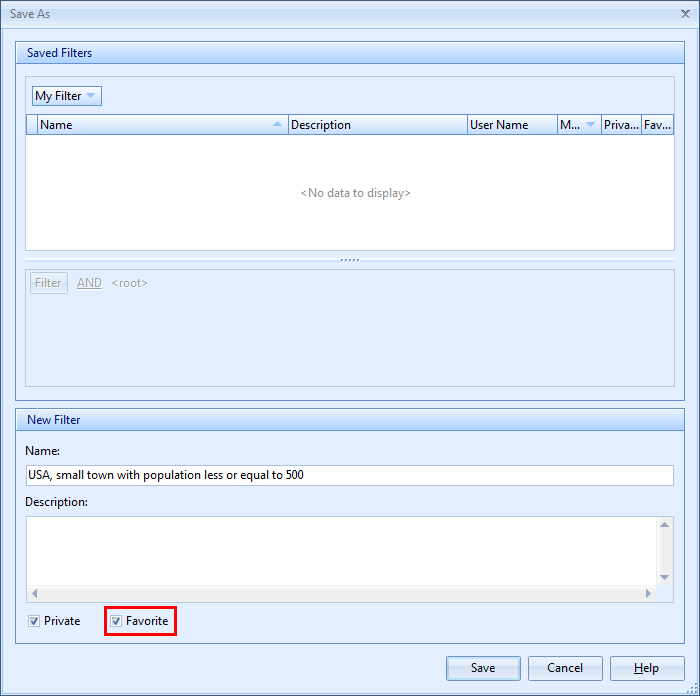
When you save a filtering expression, tick the Favorites checkbox.
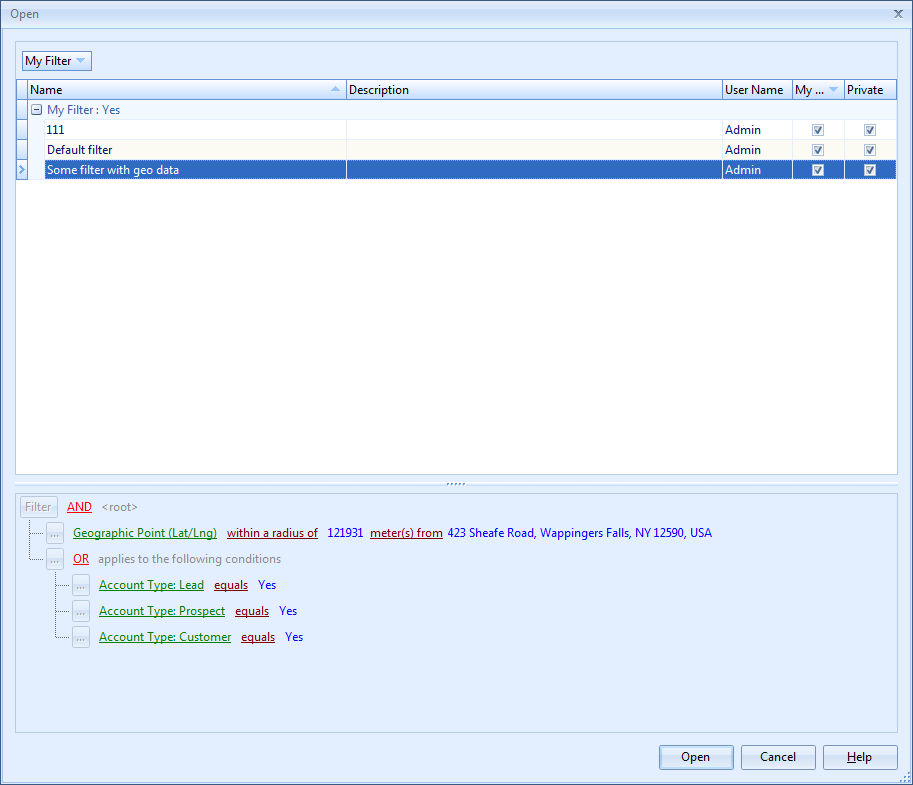
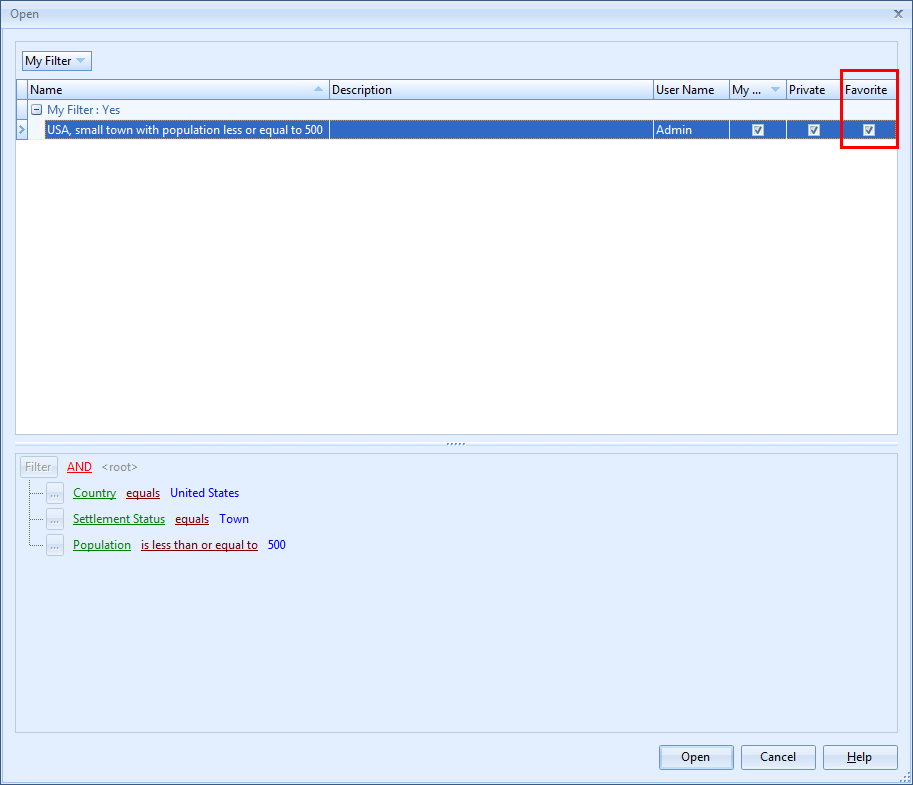
Now let’s see how the saved filter is presented in the filter storage.
The picture shows that now there is the Favorite column in the filter list. If this column is marked with a tick, according filter is added to Favorites.
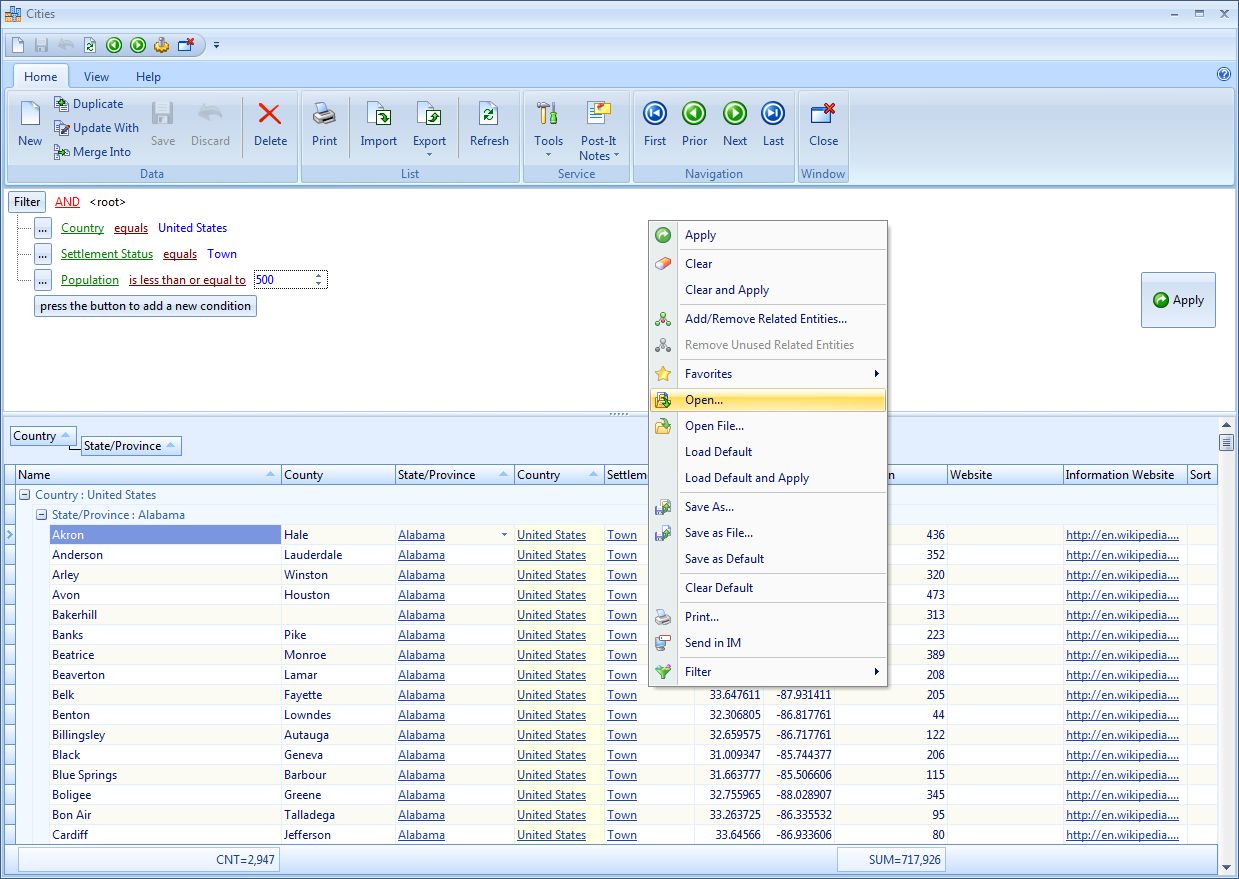
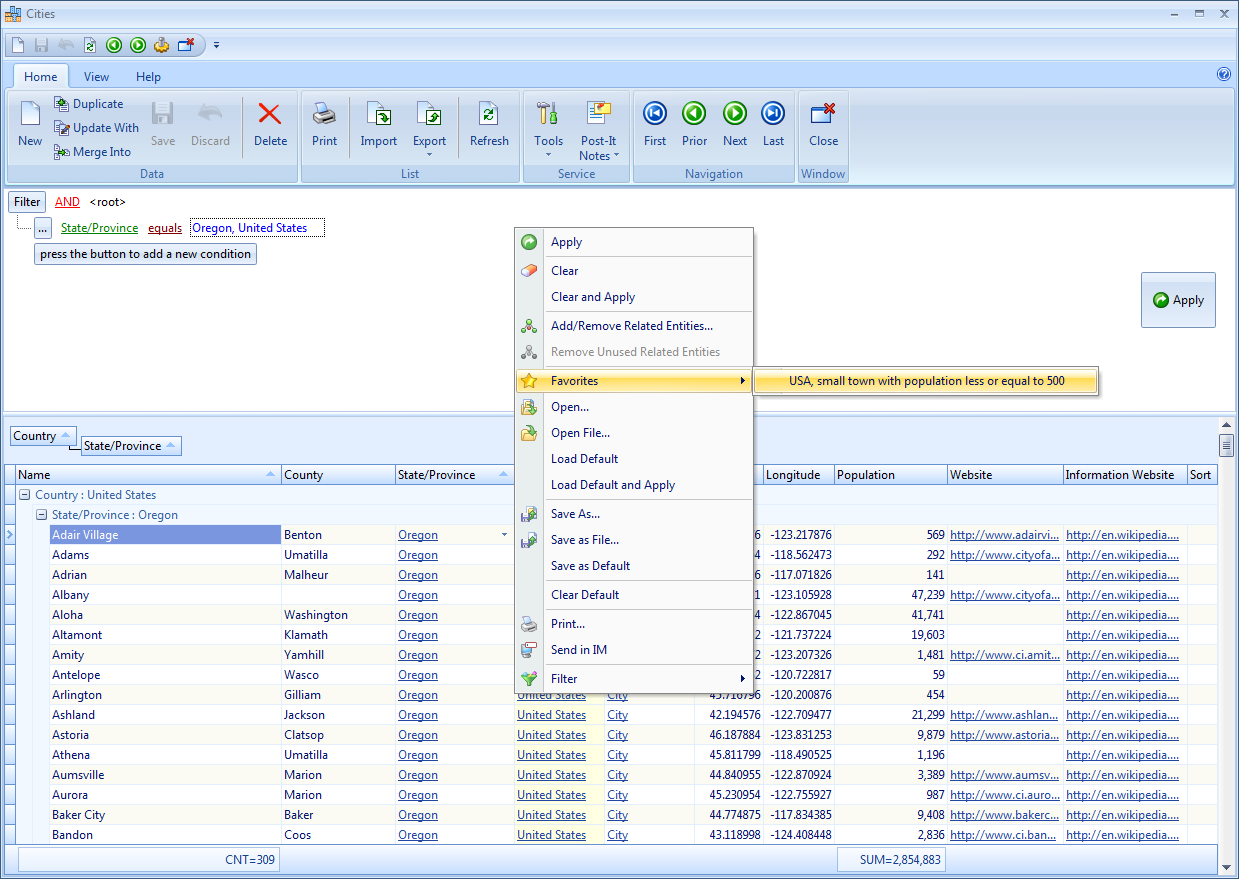
Now let’s learn how we can easily access our favorite filter. Go back to the Cities module and right-click Advanced Filter area. Hover over Favorites in the dropdown menu to see the Favorite filters list.
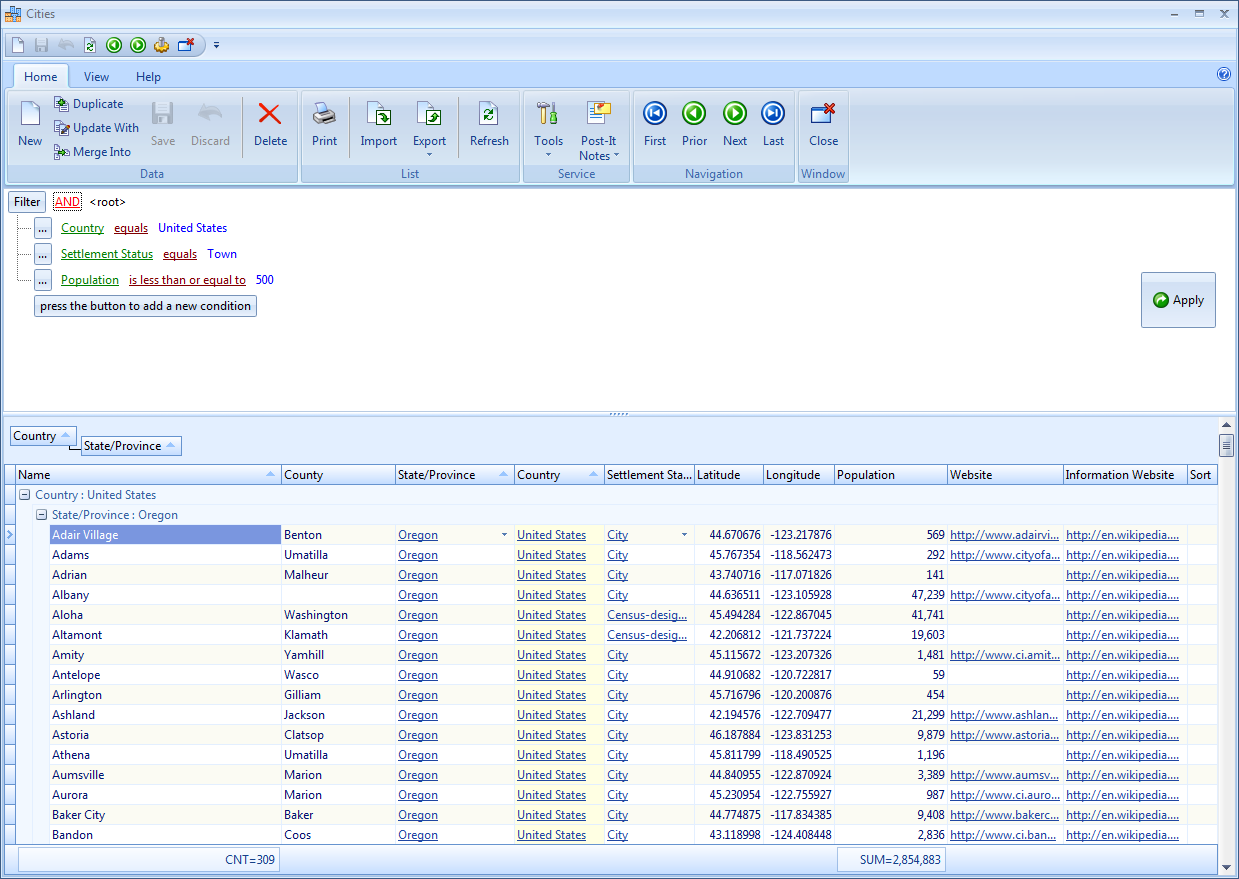
Simply select this filter to load its conditions.
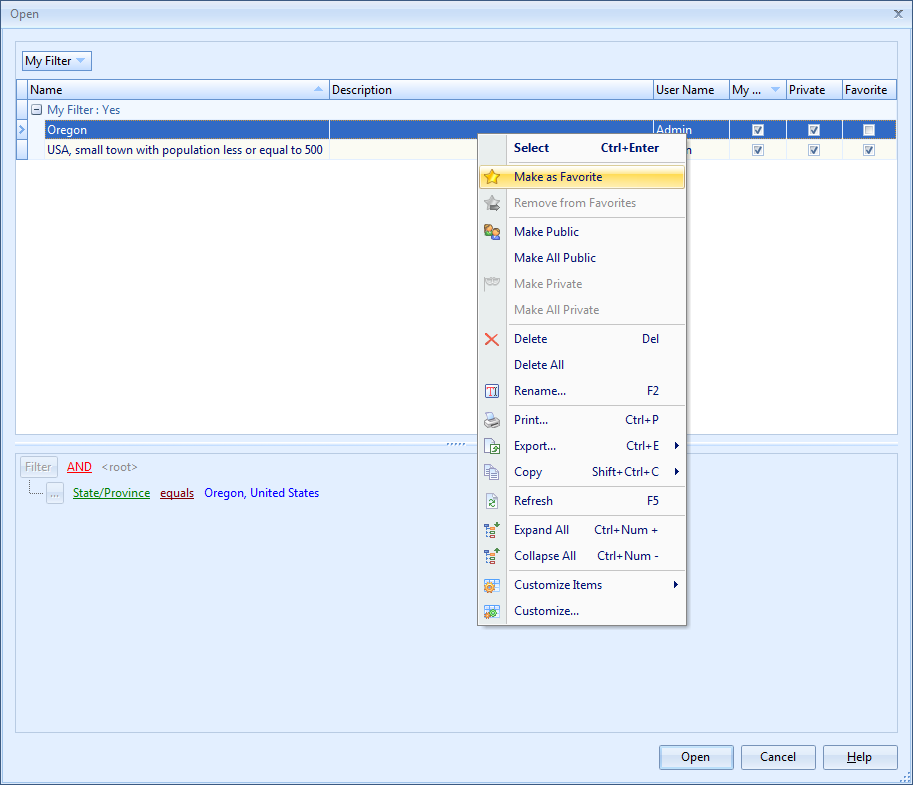
In case you need to add previously saved filters to Favorites or remove filters from the list, go to stored filters form and in the dropdown menu click Make as Favorite to add or Remove from Favorites to remove.
As you see, this feature can be very useful and practical for those who do filtering a lot and create multiple data requests while using certain filtering expressions more often.
If you've already used earlier versions of Business2Go, then you might know that exporting data from the application even to the most popular file formats was a real pain. However, the latest release of Business2Go v3 resolves all these inconveniences with the new data export functionality for all data lists. Now you can export your data to the following formats in a couple of clicks:
Business2Go Data Interchange Format;
MS Excel 2007 Workbook;
MS Excel 97 - 2003 Workbook;
Adobe Acrobat Document;
Text Format;
Web Page;
XML Document.
The application also supports quick export, which is especially useful for exporting entire data lists with minimum efforts, as well as advanced export with extended capabilities.
QUICK EXPORT
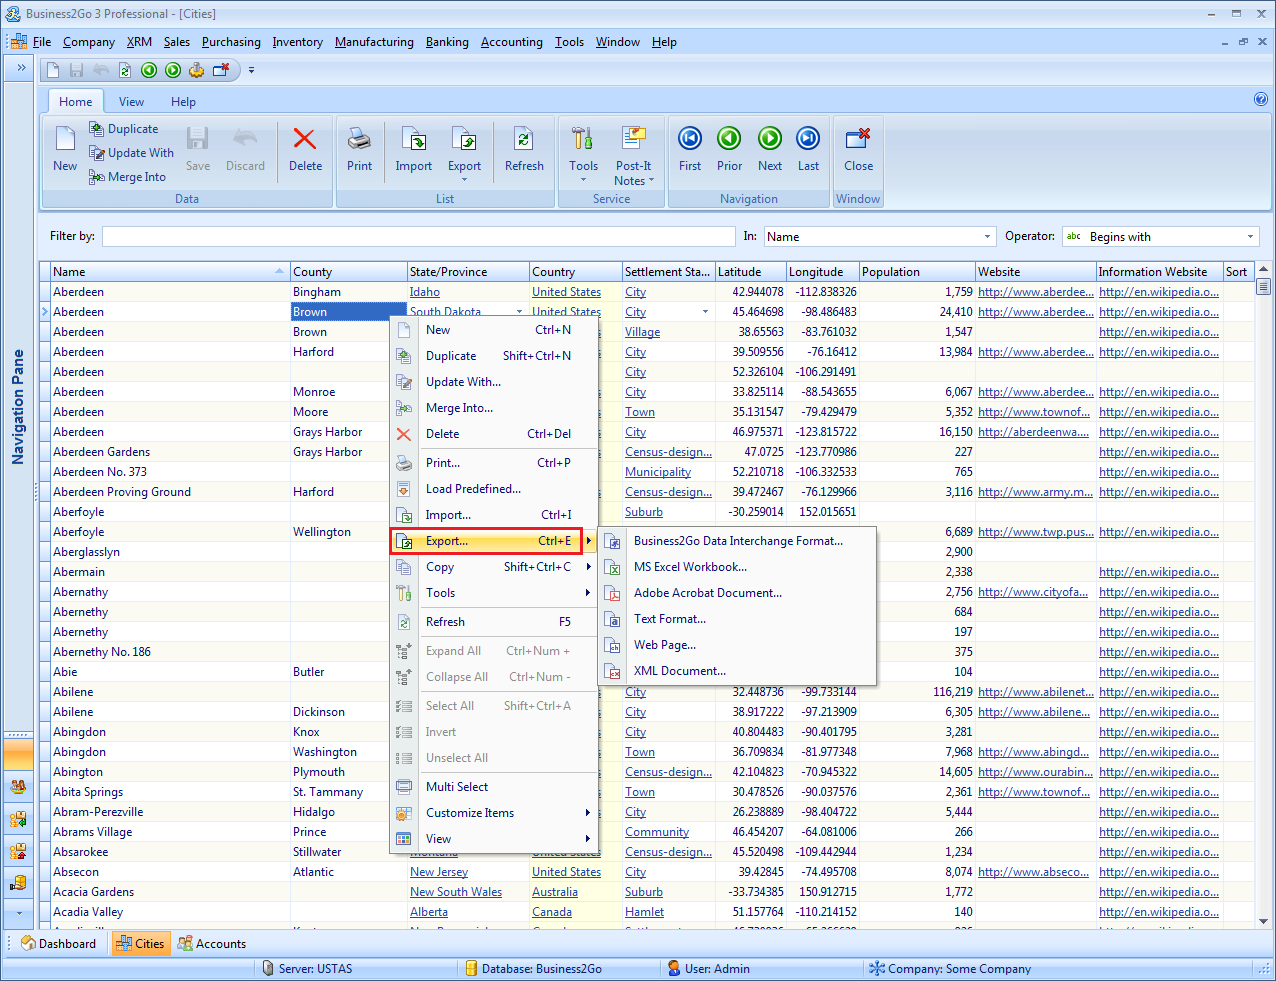
To quickly export a data list, simply right-click the list to access its shortcut menu and choose the target format, as shown in the figure below:
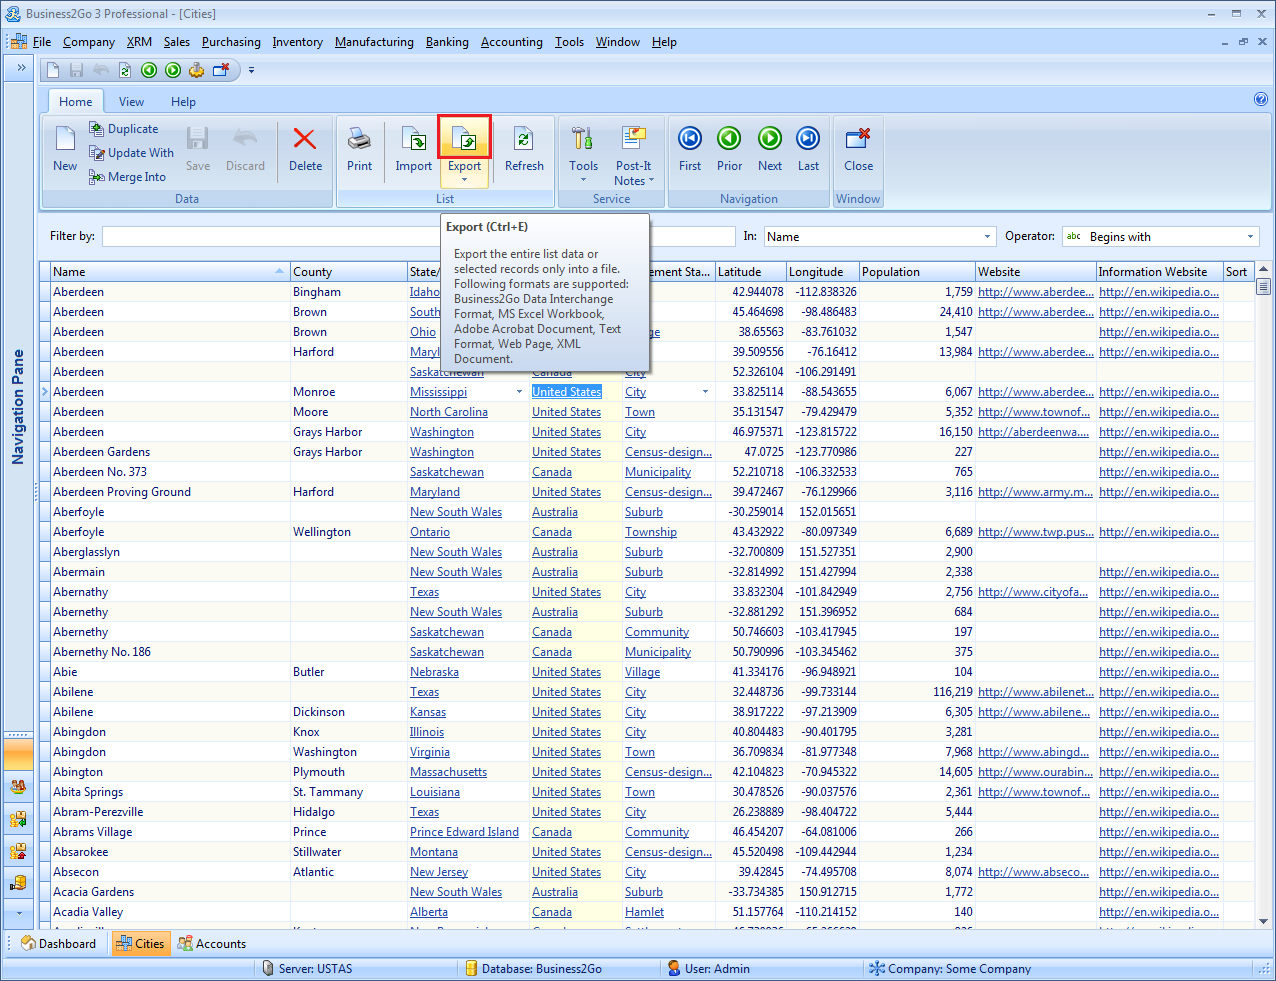
Alternatively, you can also access the quick export feature from the ribbon menu:
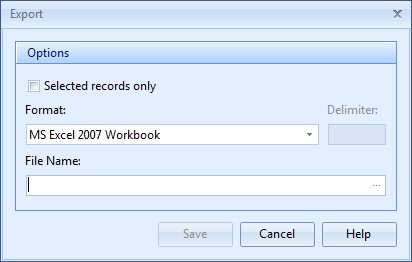
In the next step, choose the target format and specify the name and location of the output file. For example, if you select to export into MS Excel Workbook, the following file save dialog will appear:
The File name field is usually populated with the name of the data list you're exporting. Then you should choose a location to save the resulting file and click Save.
Note that the app provides two ways of exporting data into Excel: MS Excel 2007 Workbook (xlsx) and MS Excel 97-2003 Workbook (xls). As for the text formats, they also have two options: Comma Delimited Text File (csv) and Tab Delimited Text File (tab). The format type can be specified in the Save as type field of the Save As dialog.
ADVANCED EXPORT
The advanced export mode provides several additional options that you can customize. To enable the advanced export, use the shortcut menu:
Alternatively, you can access the advanced export from the ribbon menu:
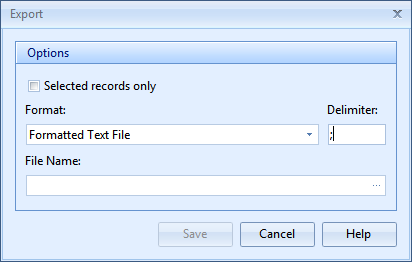
Once the advanced export is launched, the following screen appears:
From here, you can export certain list items rather than an entire list by choosing Selected records only or use our new text format called Formatted Text File to export your data. If you choose this format in the Format field, the Delimiter field will be enabled where you can specify a separator for the columns in the resulting file.
AND A LITTLE BIT ABOUT THE EXPORT FORMATS
BUSINESS2GO DATA INTERCHANGE FORMAT
This is our internal data representation format which is perfect for data exchange between installed copies of Business2Go, e.g. when you need to move certain information between databases. Since it's an XML-based format, you can use it in other 3rd party applications for various data exchange purposes.
One of the major features of exporting into this format is that all data types and representations of the original data list are preserved in the output spreadsheet, e.g. numeric cells will remain numeric and will look like a number. If the original data list contains groups and sub-results, then they will also be safely moved to Excel Workbook.
MS EXCEL 97 - 2003 WORKBOOK
The data is exported similarly to MS Excel 2007 Workbook, except that due to the restrictions of this legacy format, a sheet can contain only 65,536 rows.
ADOBE ACROBAT DOCUMENT
The important limitation of this format is that you can export only entire data lists rather than selected rows. If the original data list contains groups and sub-results, then they will also be safely moved to the output file.
TEXT FORMAT
Business2Go app allows for exporting data into plain text formats as well. The columns are usually separated from one another using TABs (Tab Delimited File) or commas "," (Comma Delimited File). However, you are free to set up your own delimiter character if necessary.
WEB PAGE
The data is exported into a standard HTML file along with all groups and sub-results contained in the original list. This format is convenient for rapid exporting of data which will then be published on the website.
XML DOCUMENT
The format consists of two files, which are an XML file and a separate style sheet stored in an XSL file. If the original data list contains groups and sub-results, then they will also be safely moved to the resulting data file. This format is convenient for rapid exporting of data which will then be published on the website.
One of our major wins in Business2Go v3 is that we've migrated the product to MS SQL Server, and now the users will be able to work with much larger data volumes without experiencing any freezes. However, we'd like to emphasize that it is still not recommended to work with really huge databases containing dozens of million entries on the client side. For example, our tests detected that selection of 50,000 entries on the client side takes about 3 seconds while selection of a million ones may require a minute or even more. But if you apply a filter to narrow the selection to several thousand entries (from the several million ones stored in the database), then the data selection procedure will complete in about a second. In other words, using filters with relatively small selection (not more than several thousand entries) will allow you to handle the data very quickly and without any latency even for a really giant database of million entries. More details on how to use data filters can be found in the article.
SORTING
The latest release of Business2Go features lots of useful tools that dramatically improve the functionality of the plain data lists compared to the previous versions. For instance, now you can sort data by several fields in the list at once (in ascending or descending order). To sort a list by several fields, all you have to do is to click the header of the first column, and then, while holding the SHIFT key, click the headers of the other columns, one by one. In the figure below, the sample list of cities is sorted by columns in ascending order: Country, State/Province, Name.
GROUPING DATA AND CALCULATING RESULTS
Yet another new thing is that you can group the data in the list by one or more columns. To apply grouping by column, simply right-click these columns and in the context menu that appears choose Group By This Field. Alternatively, you can choose Group By Box in this context menu and then drag the columns from the list to the grouping area. The example below shows a list grouped by the following fields: Country, State/Province.
You can also easily calculate the column results when required. To display the results, right-click a header of any column in the list and then choose Footer, as shown in the figure below.
Then you will see a rectangular area just under the list where you can generate a result next to each column. The following results are supported: Sum, Min, Max, Count, Average. The numeric fields support all five types of results, while the date/time fields support only Min, Max, and Count. Fields of all other types support only Count. The figure below illustrates how to generate the Count result for the Name field.
And that's what we get:
Another major hallmark of the results feature is that you can obtain several results for a single column. In the figure below, you can see the results Sum, Min, and Max generated for the Population column.
And what is more, the results for groups are also supported. For example, let's group columns Country and State/Province. Then let's insert the Count result into the footer, then the Name column group with the Sum result into both the footer and the Population column group. To do this, first right-click the header of the Country column and in the context menu that appears choose Group By This Field and then repeat exactly the same for the State/Province column. You will get something similar to what's shown in the picture below.
Now let's insert the results. To do so, simply right-click any column in the list and choose Footer from the context menu, then right-click it once again and select Group Footers. The output should look like in the following picture.
In the next step, we'll add the Count result both to the general footer and to the footer of the Name column group, and then add the Sum result both to the general footer and to the group footer. The final output will be a list with results in the columns Name and Population along with sub-results in each group. Here it is:
So, to put it in short, the software now boasts a really powerful tool for sorting data and generating results and sub-results in the data lists without any MS Excel spreadsheets or any of the sort.
SETTING UP THE LIST FIELDS
Another new feature of the application is that you can quickly set up any field in a data list. Now you will be able to add or remove a field in the list literally in two clicks. To configure the fields which must be displayed in the list, simply right-click anywhere in the list, choose Customize Items from the context menu and then add or remove fields as you want.
Alternatively, you can adjust the necessary settings using the ribbon menu of the application.
VIEW MODES
Yet another new and very useful option is that a list can now be displayed in various modes. The basic and default view mode is a plain table. Since many users find it inconvenient to work with really large lists, we've implemented an efficient workaround which allows you to view the data on special cards. Let's see how it works, taking a list of companies' addresses as an example. Here's how this list looks like in the plain table view:
And here's the same list in the card view:
As you see, the card view is a much more clear and structured way to view (and, sometimes, even edit) the information, since everything is grouped by theme and seems quite intuitive. To switch between view modes, you can use either the context menu or the corresponding icon on the toolbar:
DATA TRANSFERS
We've got excellent news for people who often share or exchange various data with other systems which was a real pain in the previous versions. We've implemented both data import and data export functionality for all lists. And what is more, there are some advanced data exchange features in this release:
You can quickly print a list;
You can copy an active cell, selected lines in the list or even the whole list (either with or without headers) to the Clipboard and then paste them to Excel or similar software;
You can export all data in the list or only selected items to the following formats: Business2Go Data Interchange Format, MS Excel Workbook (97 - 2003, 2007), Adobe Acrobat Document, Text Format, Web Page, XML Document. Business2Go Data Interchange Format is our internal data representation format which is perfect for data exchange between installed copies of Business2Go, e.g. when you need to move a certain information between databases.
The data import is also possible for any editable data list. Now you are encouraged to import any list of products, customers, delivery notes and so on much easier than ever before. The application seamlessly supports all formats you might ever need: Business2Go (other or older databases), Business2Go Data Interchange Format, QuickBooks, Inflow Inventory, MS Access, MS Excel Workbook, MS SQL Server, Text Format (CSV, TAB, Formatted Text).
BULK DATA OPERATIONS
The bulk data operations can save your time and efforts by means of automating routine operations with a large number of entries. In most cases, the basic working mode with lists is when only one entry is selected and considered active. To handle many entries at once, you need to enable the multiple selection mode by choosing Multi Select either from the context menu or on the toolbar.
Once this mode is on, you will be able to select multiple entries one by one (while holding the CTRL key and sequentially clicking the entries) or all at once (by pressing SHIFT+CTRL+A). Then, the selected items can be easily copied to the Clipboard, exported into any supported format (except Adobe Acrobat Document in which you can export only the entire list), duplicated, deleted, populated with a certain value, or even merged together. You will also get access to some specific functions, such as posting all selected invoices to generate the corresponding record in the General Ledger. Another example is assigning geo codes to all selected companies based on their addresses (i.e. calculating latitude/longitude), in order to make it possible to use advanced filtering with the following conditional operators: inside polygon, not inside polygon, within a radius of, not within a radius of. Therefore, the multiple selection feature will be of great use for you and will save your time and efforts every day you work with Business2Go.
Let's see how to efficiently use the multiple selection tool for one of the new functions we've added in this release. Suppose we want to populate a certain field in each selected entry with the same value. We have multiple entries assigned to Admin of the system, and we'd like to re-assign them to another user, such as Batman.
To perform a bulk update, choose Update With. The following window will display:
In this window, find the Assigned To field in the list, type Batman and then click Update. On the next step, the list will be populated with the new value and that's what we'll get finally:
HYPERLINKS
In the new version, all lists and other data input and view controls can handle hyperlinks. Just like in any web browser, you will be able to follow the links to detailed data or perform other operations. A field which contains a hyperlink is easy to recognize - the text is underlined and highlighted in blue, and hovering the cursor over it while holding the CTRL key will change its color just as in a web browser.
Clicking such a link displays the detailed data about a certain item.
The hyperlinks allow you not only to jump to detailed information, but also perform additional operations, e.g. clicking an email address will create a new email message while clicking a phone number will launch Skype.
DROP-DOWN LISTS
The drop-down lists provide a convenient way of selecting a value in a field. In most cases, drop-down lists are intuitive and very easy to use. The only thing you need to do is to open the list of available items and choose the one that best fits this field. However, sometimes users expect additional functionality from the drop-down lists, especially in the following situations:
When a drop-down list contains a very large number of items;
When a user wants to edit or customize the items provided by a drop-down list;
When a user wants to add a new data to a drop-down list or update the existing items.
In this release, all drop-down lists allow you to set up the columns, perform multiple sorting and grouping, generate results and sub-results for fields and groups, apply quick filters and advanced filters, and much more. Also, if a drop-down list lacks certain data, you can easily launch a module to create this data directly from the drop-down list (to create a new data, click New; to edit the existing data, choose Edit).
This article covers only new basic features regarding the data lists - that is, the features available almost in every list. But we've also have a plenty of other brilliant tools prepared for you, which are more specific and which we're going to talk about in our future articles.
Business2Go v3 provides a completely re-worked filtering and search mechanism for such lists as Cities, Customers, Vendors, Invoices and others. Our experience has shown that in some cases the user needs an ultimately simple time-saving filtering mechanism, other cases require advanced search options. To meet these needs, Business2Go provides two types of filters:
Quick Filter - this filter is best used for simple lists or lists with a natural key. For example, the city list has the Name field that contains the city name by which the search of the required city is performed to fill in the address fields in the customer and vendor cards. This filter is ultimately simple and is aimed at the quick search of the required information;
Advanced Filter - this filter is applied in cases of complex search condition, or when the information does not have an easy to remember natural key. For example, lists of invoices, purchase orders etc. The filtering criteria in such lists are usually quite diverse. For example, you might need to see all invoices created by a specific user for a specific period, or all unpaid invoices for a specific customer in the past year. This filter type allows creating any filtering criterion, which, on the other hand, takes time and adds complexity compared to Quick Filter.
It is up to you to decide when to opt for Quick Filter or Advanced Filter, depending on your needs. It takes a couple of clicks to switch between the two of them.
Let us have a closer look at each other the two filters.
QUICK FILTER
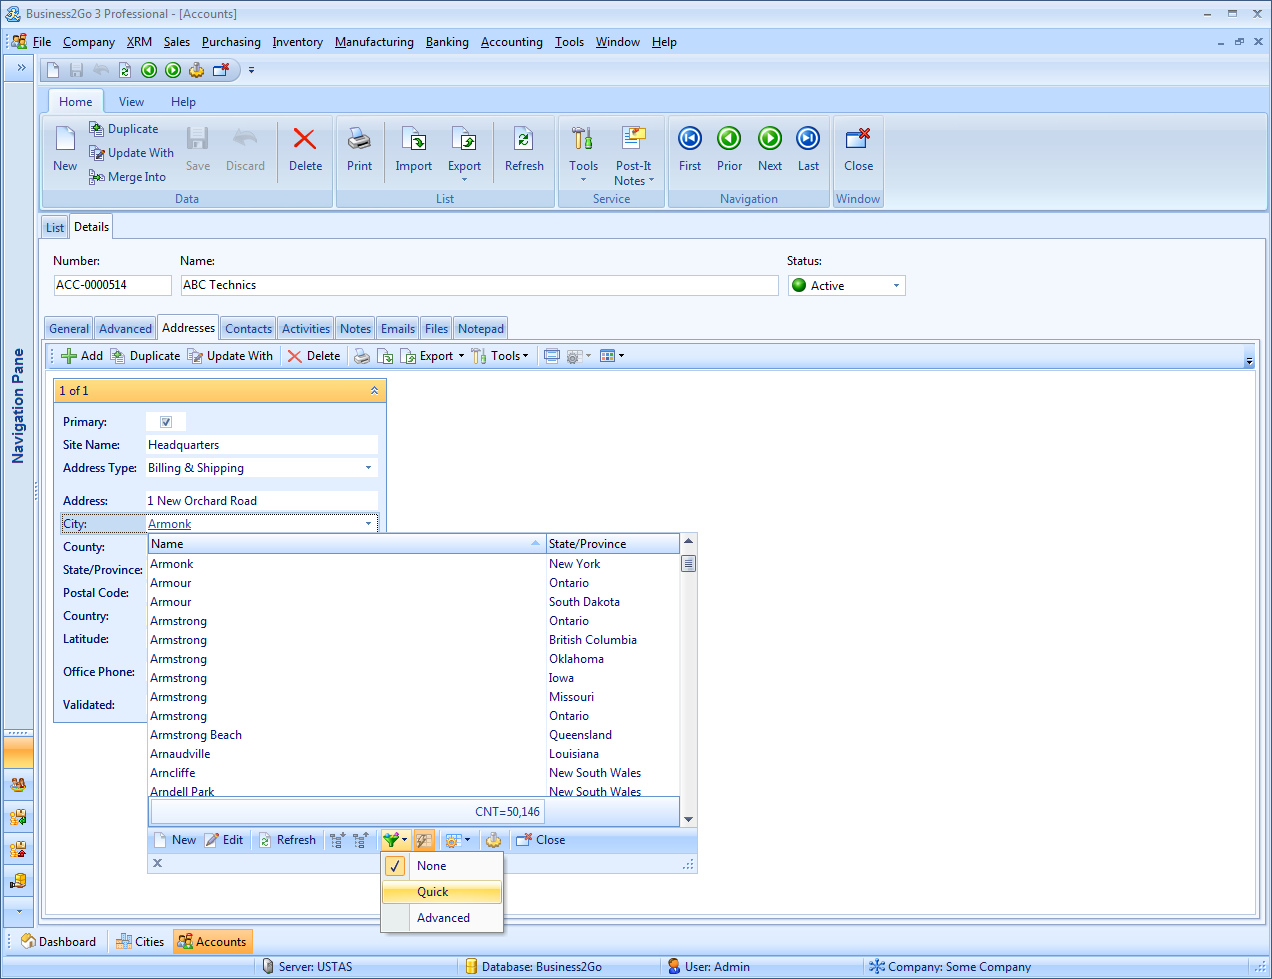
We will take the city list as example. Business2Go v3 Professional provides a ready-to-use list of the cities for the USA, Canada, Australia and New Zealand. Creating your company's database, you may choose countries whose cities you would like to add to your database. Assume that you work with all these countries and uploaded all the cities in the database. That is a considerable list with over 30,000 entries. Now you need to create a customer card and fill in the customer's address. Scrolling down the list of 30,000 entries to find the required is inconvenient, isn't it? To facilitate selection from the drop-down list, you can use the incremental search without filtering, as shown in the picture below.
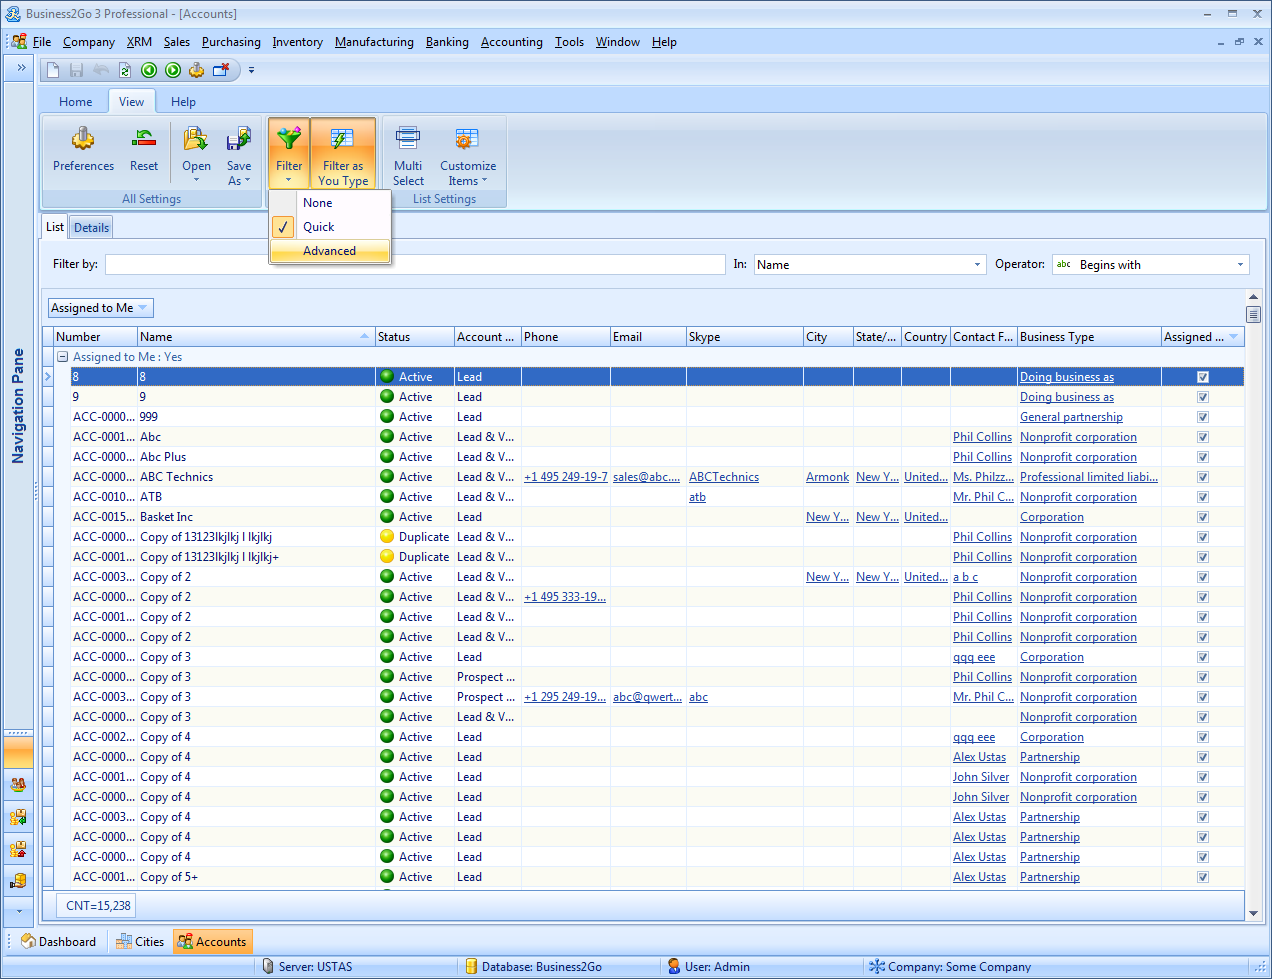
Alternatively, you may use Quick Filter. To do so, you need to enable it first. In the toolbar, expand the Filter Kind popup menu and select Quick.
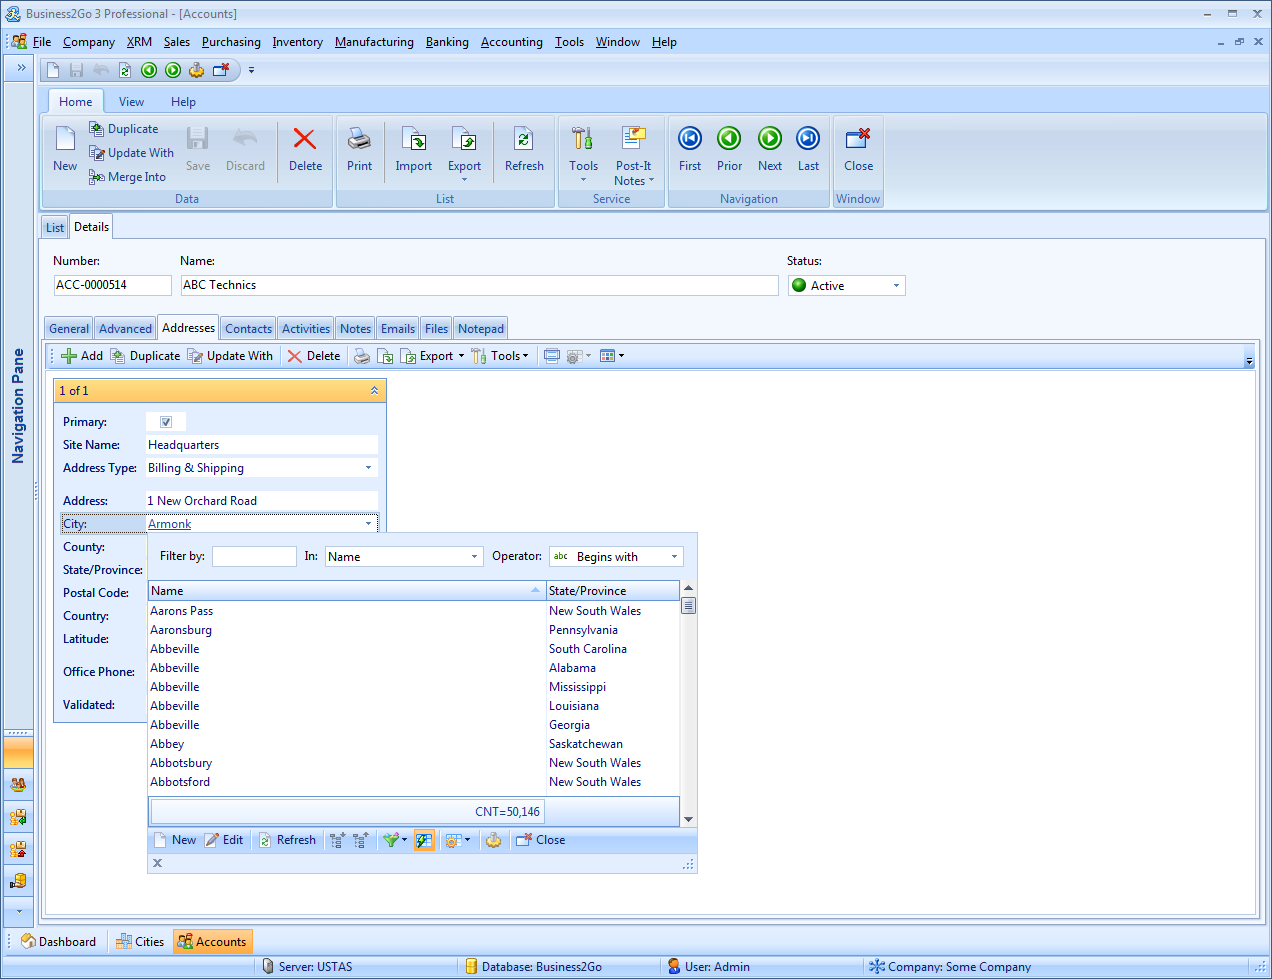
This will bring up the filter pane next to the drop-down city list.
This pane contains three controls:
Filter by where you enter the text by which the list is supposed to be filtered;
In where you select the field by which filtering is performed. Any field can be selected that is available in the basic city list. You may also select (Any Field) to filter by all fields simultaneously;
and Operator to specify the command that will be used to filter the list data.
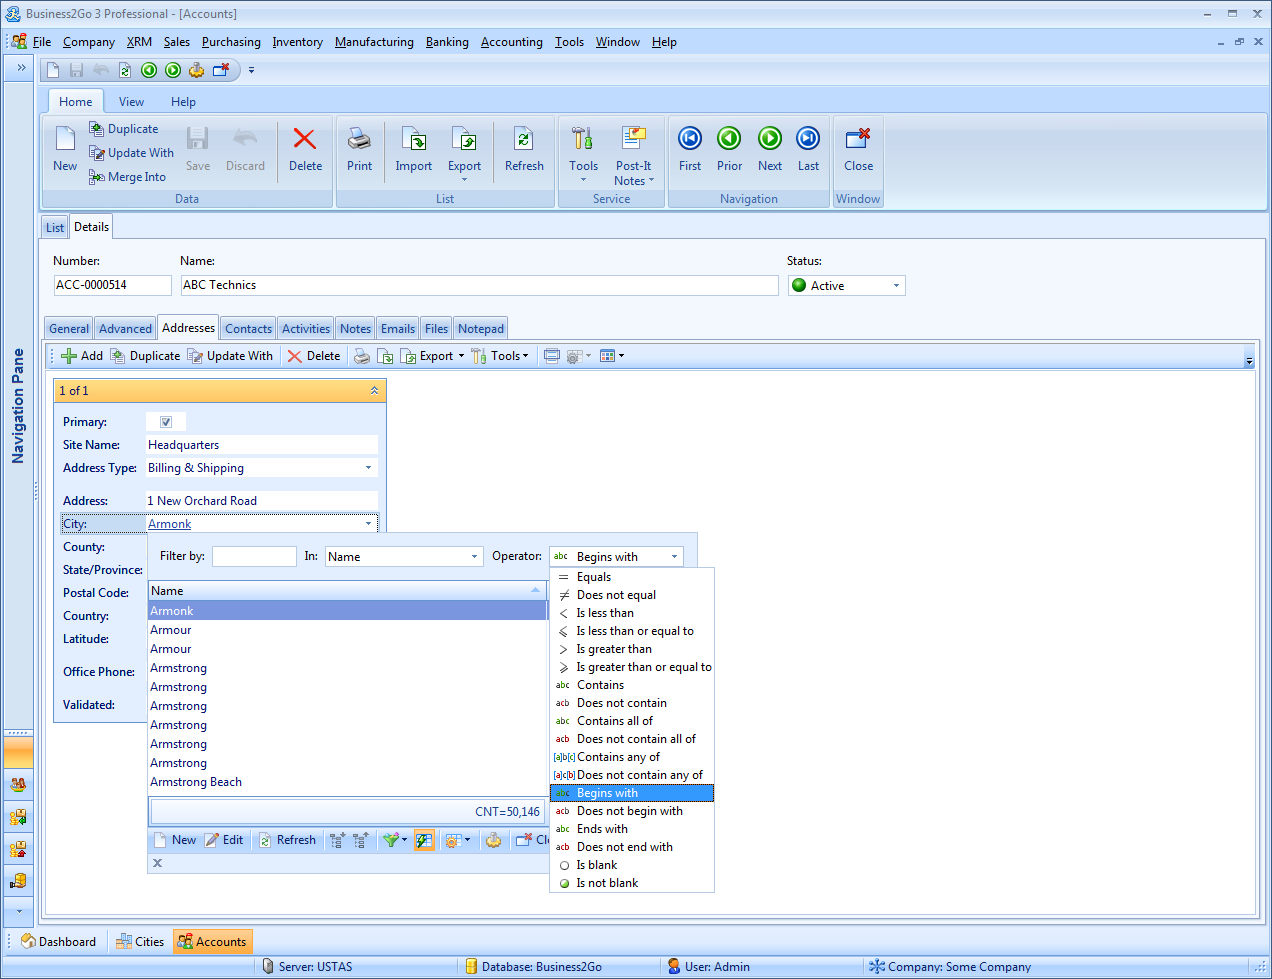
A wide selection of operators is available for you to filter the list data.
The most frequent are Begins with (filter by the first letters) and Contains (by the text contained in the name). Contains all of and Contains any of are also among the frequently used. The former is useful when you need to search long names that you partly remember. The sequence of the entered words is not important for this operator, but the name must contain all words or parts of words that you enter.
This filtering type is best used in inventory item lists, which are often quite long and contain long names that you cannot keep in mind. This filter can make finding the required item faster and easier. The latter, Contains any of, is useful when you do not remember the exact name. You only enter various combinations of the words you remember, and the system shows you all the filtered items that contain at least one of the entered words.
The disadvantage of these filtering operators is that they are not fast enough. The fastest operators are Equals and Begins with that work instantaneously even in the lists of dozens of thousands items.
Another couple of things to mention about Quick Filter are:
1) Filter as You Type mode in the Filter by field. To enable it, the Filter as You Type button () in the toolbar must be shown as active. In drop-down lists, it looks like this:
In conventional lists it looks like this:
We recommend that you disable the Filter as You Type mode when working with extremely large lists or in case your Internet connection is slow, as every time you type a character in the Filter by field, a filtering expression is sent to the database, which can overload the database. With small amounts of data (up to a hundred thousand records) neither you nor your colleagues working with the data may not even notice that slow down, but with large amounts of data, usage of Filter as You Type can have an extremely negative impact on the system speed. That is why it is highly recommended that you disable this mode when working with long lists. The Apply button will appear on the filter pane after you disable the mode. To apply the filter specified in the Filter by field, press Enter or click Apply.
2) Making a specific filter condition a default filter. Every time you open the corresponding list or drop-down list, the default filter will be applied by filling in the Filter by, In, Operator fields. For example, assume that the Filter by field is empty, (Any Fields) is selected in the In field and Contains is selected as operator. To save these selections, right-click the filter pane. The context appears:
Select Save as Default. Now every time you open this drop-down list, the Filter by, In and Operator will contain the selected values.
ADVANCED FILTER
This filter is best to use when there is no obvious or easy-to-remember natural key, or when you need to search with complex search conditions.
To enable Advanced Filter, open the Filter Kind menu and select Advanced.
This will switch the mode from Quick Filter to Advanced Filter.
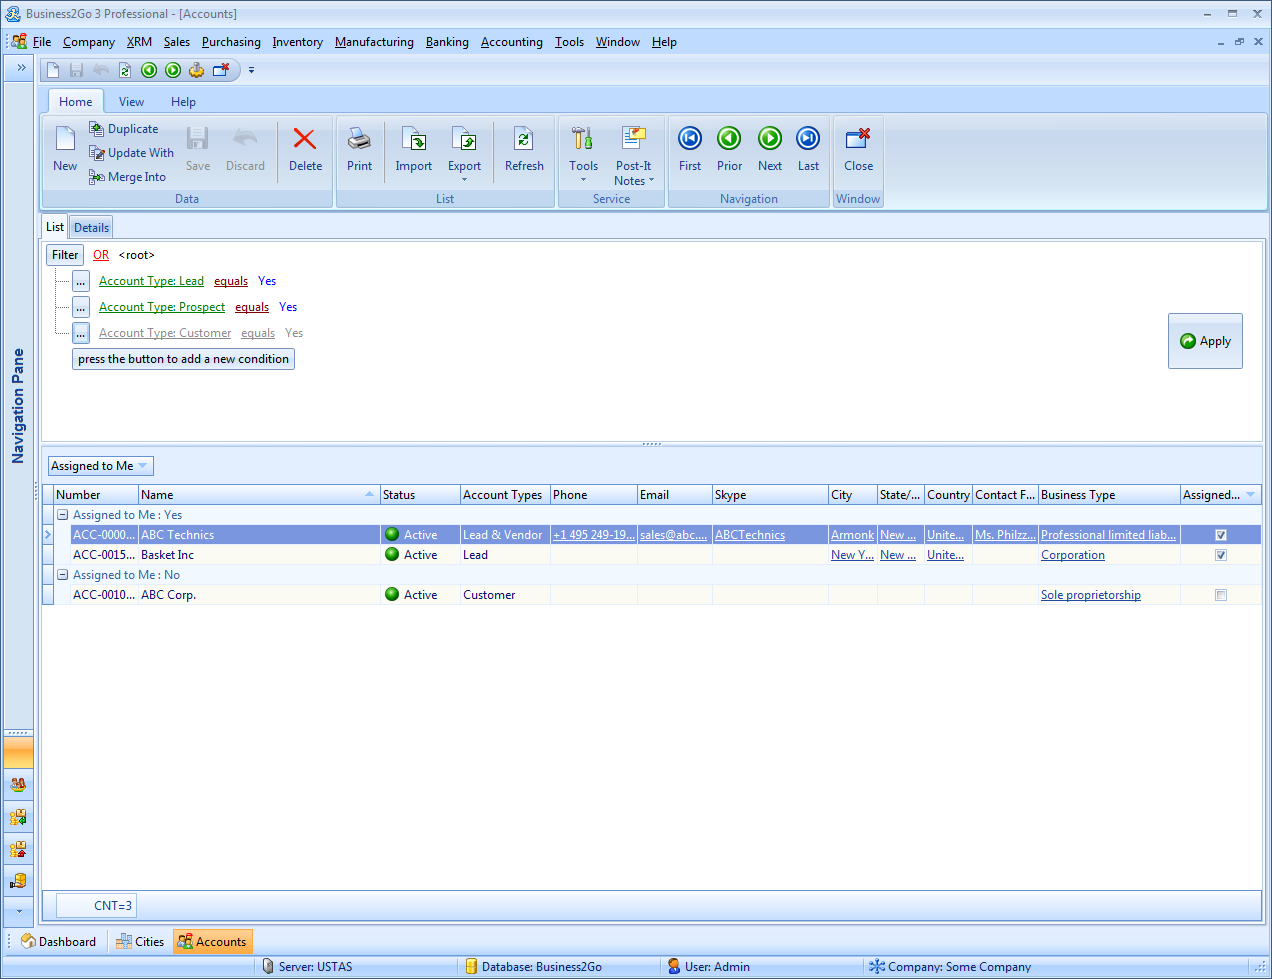
Now try to create a filter expression that will bring up all our Leads, Prospects and Customers. As companies we are searching must have either of the three account types: Lead/Prospect/Customer which means that we need to set the logical OR for the condition group.
Click press the button to add a new condition and add three conditions.
Click Apply to apply the filter.
Similarly, you can create selection of almost any complexity using complex conditions and even more. Advanced Filter allows geographical filtering to select data from a specific region on the map, for example, a state, city district, street, quarter etc. To apply this filtering type, you must geocode all the addresses first.
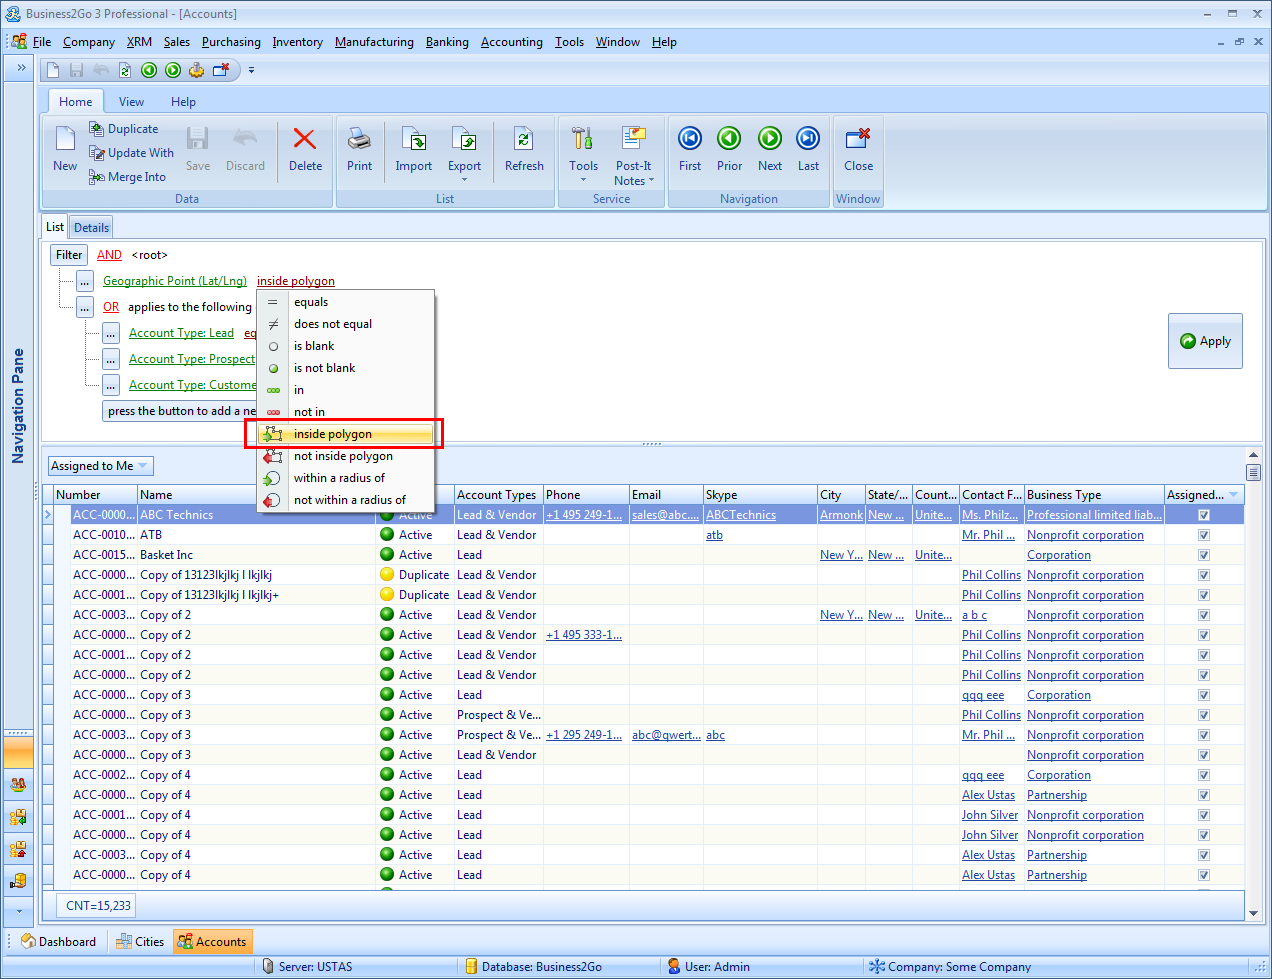
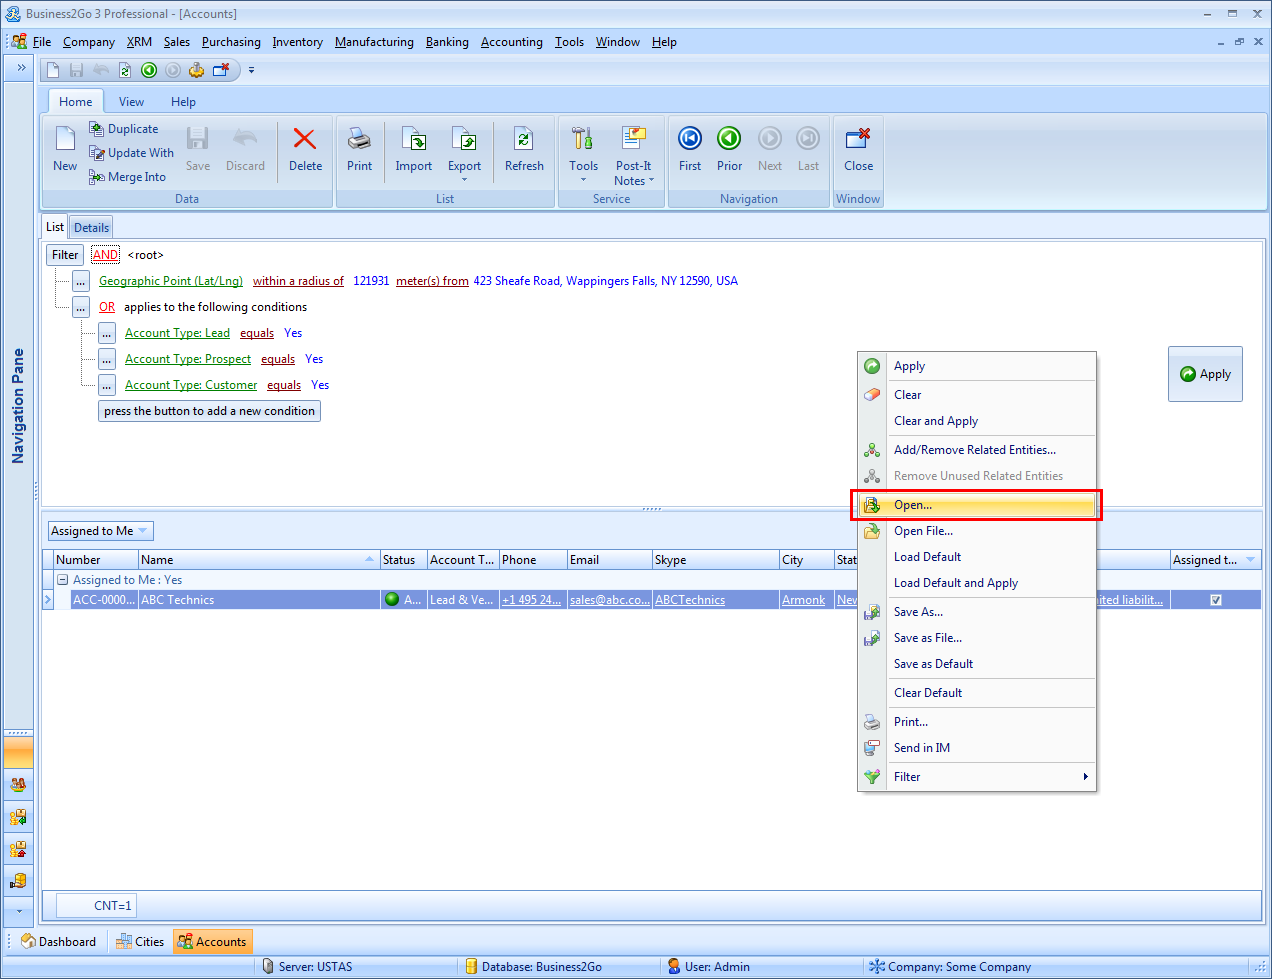
Now, let us make the conditions even more complex and try to find leads, prospects and customers in a specific part of the state of New York. To do so, we need to change the filtering condition by adding a new condition with the field Geographic Point (Lat/Lng) and select inside polygon as operator.
To select the region on the map, click the ellipsis button.
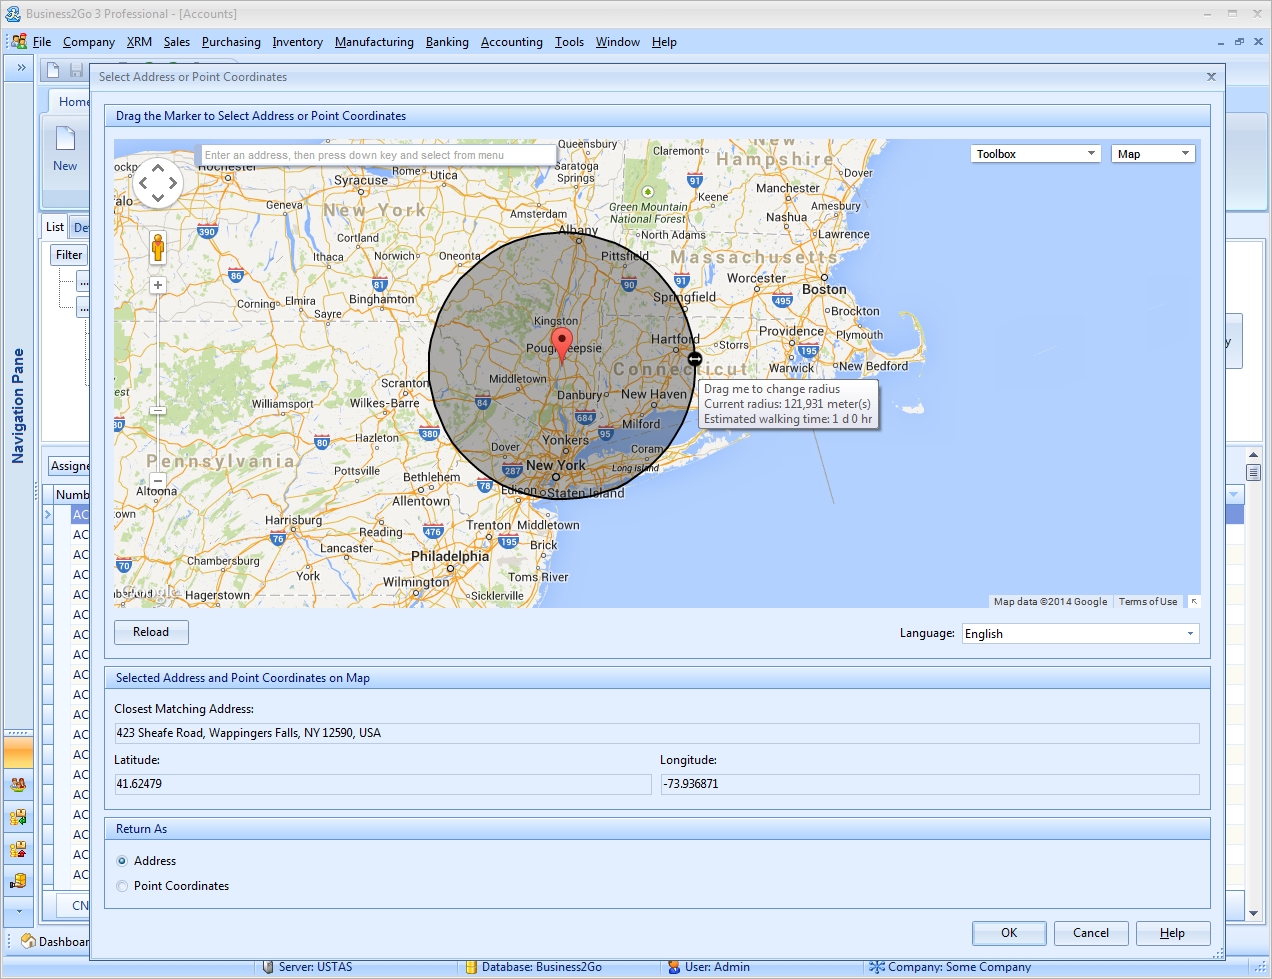
This brings up the map where we draw a polygon to search in.
In the selection dialog, click OK, and the polygon vertices from the Polygon Points (Lat/Lng) will be added as filter conditions.
Click Apply to apply the filter. The selection shows up.
With the geo-filtering operator within a radius of, you can search within a certain area around a specific point. The point can be set as address or coordinates of latitude and longitude.
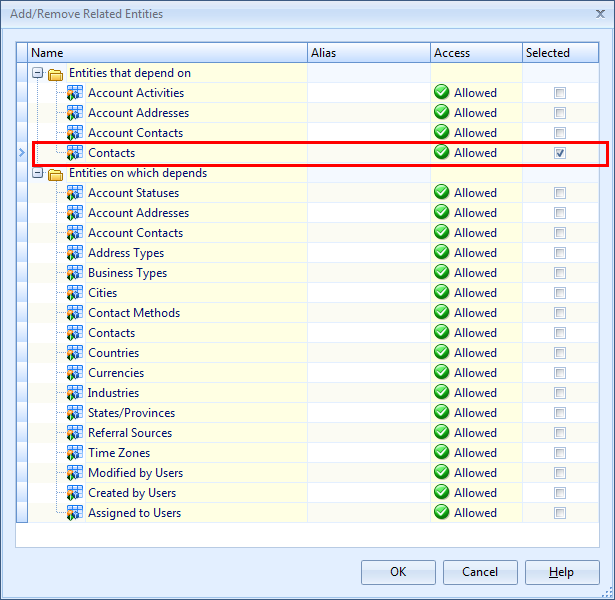
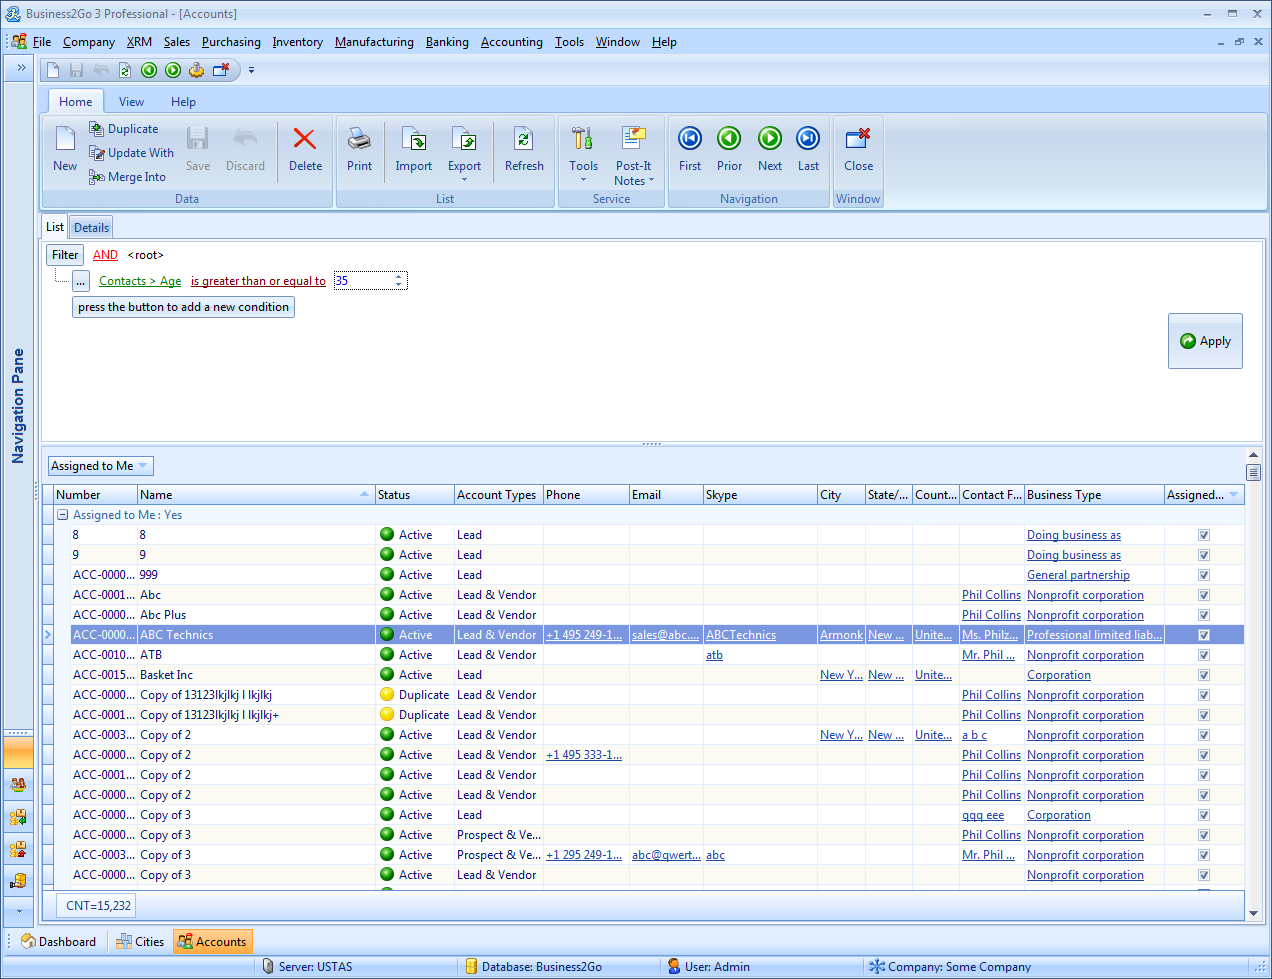
Another feature of Advanced Filter is the ability to refer to related data fields. It means that in the Accounts module filter you can refer to Invoices or any other module fields, if its data are related to Accounts. For example, we need to select companies that have at least one contact person older than 35. To access contact data we need to add these data...
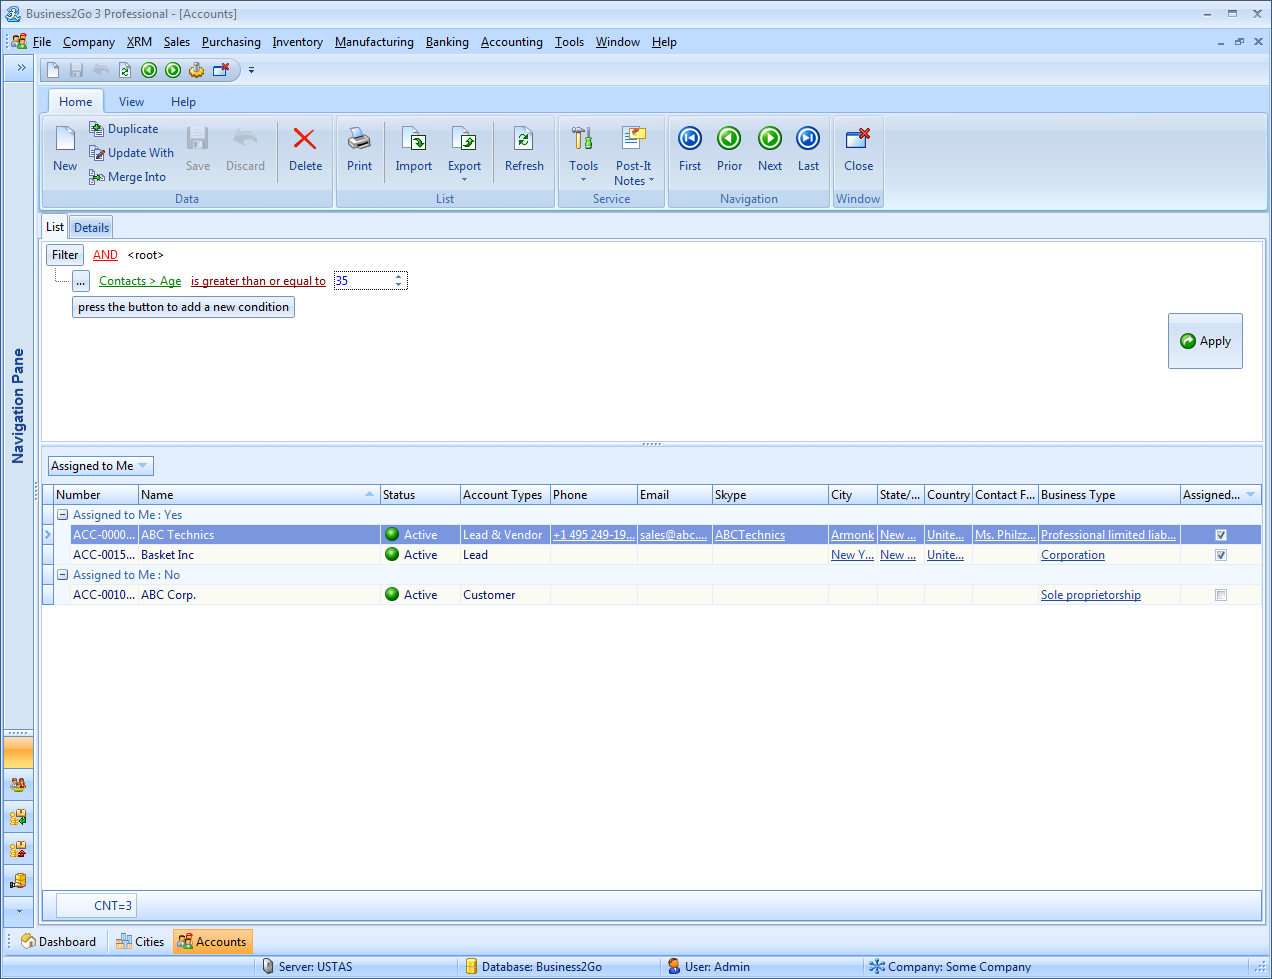
...and create a filter condition. Click Apply.
Other useful features of Advanced Filter include:
1) Ability to disable some filter conditions
2) Ability to save filter expressions to reuse and share with other users
3) Additionally, if you use a specific filter expression frequently, you do not have to create it every time you open the module or the drop-down list. You can simply create the expression once and save it as a default filter that will be applied automatically, when you open the respective data list
With all the features mentioned above, Advanced Filter is an amazingly powerful tool to perform a wide variety of tasks, that can be used both for its direct purposes to filter data in modules and drop-down lists, and to generate ad-hoc queries - a reporting system of sorts.


 ) in the toolbar must be shown as active. In drop-down lists, it looks like this: